

Building a website from scratch is an exciting journey. Whether you are launching a personal blog, an e-commerce store, or a portfolio, your digital presence needs a reliable home on the internet. If you have ever wondered how to host a website, you are not alone. While the technical jargon can feel overwhelming at first glance, the process is incredibly straightforward once you break it down into manageable steps.
A clear understanding of the fundamentals of web hosting can help you make a more informed decision when selecting a provider.
In this comprehensive guide, we will walk you through everything you need to know about hosting a website, from selecting the right server environment to configuring your domain and securing your data.
Table of Contents

Step 1: Understand Your Hosting Options
Before diving into the setup process, you need to determine what type of server environment best suits your project. Not all hosting is created equal, and understanding your options will save you time and money.
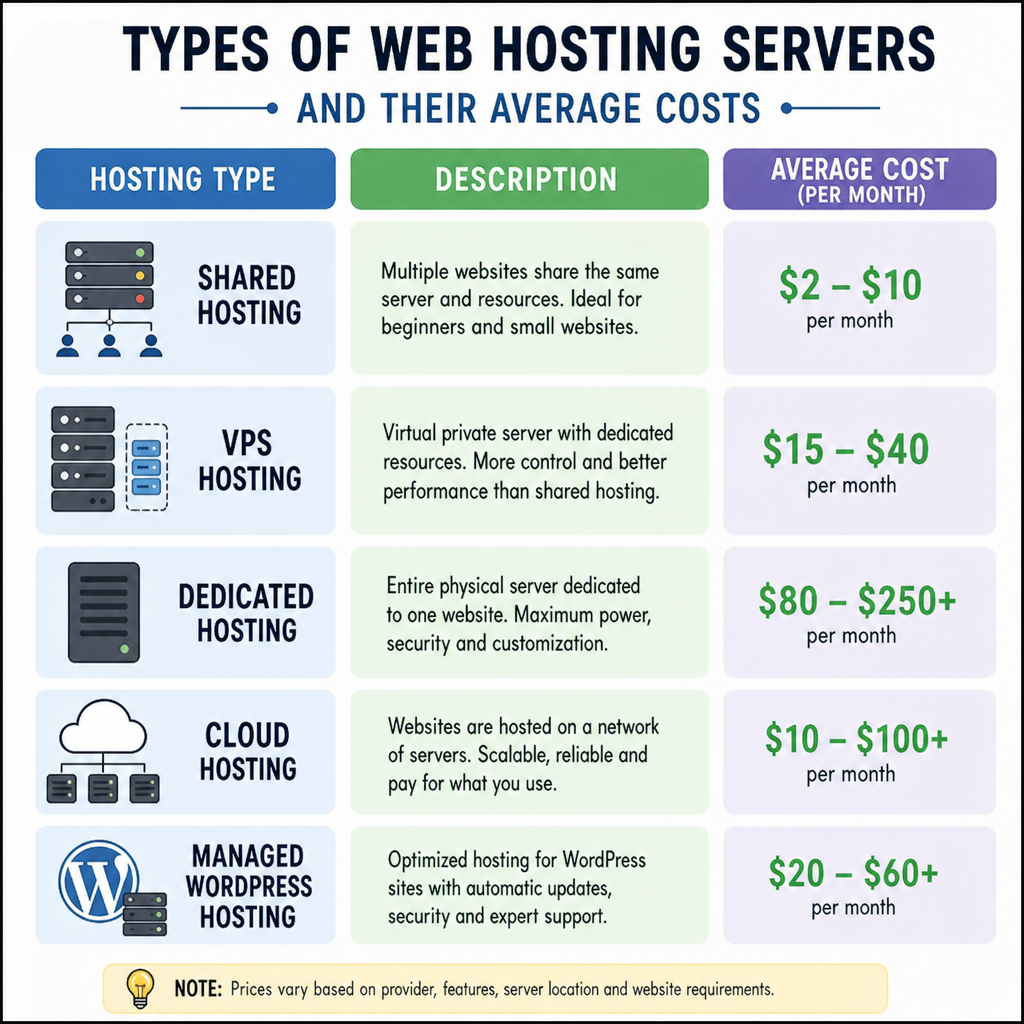
The Standard Options: A Shared vs VPS vs Cloud Hosting Comparison
When choosing a server environment, most beginners start with one of three primary architectures:
- Shared Hosting: Perfect for beginners looking for easy website hosting. Your site shares server resources (like RAM and CPU) with hundreds of other websites. It is highly affordable but can be slower if neighboring sites experience traffic spikes.
- Virtual Private Server (VPS): A step up from shared hosting. While you still share a physical server, you are allocated a dedicated portion of its resources. This ensures better performance and more control.
- Cloud Hosting: Instead of relying on a single server, your site pulls resources from a network of virtual servers. It is highly reliable; if one server fails, another takes over seamlessly.
Managed vs Unmanaged Hosting Services
As you browse plans, you will often see these two terms. Managed hosting means the provider handles backend technical tasks like security patching, software updates, and server maintenance. Unmanaged hosting gives you total control over the server, but you are entirely responsible for its upkeep—ideal for experienced developers but risky for beginners.
Alternative and Niche Hosting Methods
If you are tech-savvy, you might be curious about how to self host a website. This involves turning a personal computer or a Raspberry Pi into a web server. While it offers ultimate privacy and control, it requires a robust internet connection, 24/7 electricity, and advanced security knowledge.
Alternatively, if you are building a site using only HTML, CSS, and basic JavaScript, you might want to look into how to host a static website on S3. Amazon Web Services (AWS) offers this incredibly cheap, scalable solution for static files, bypassing the need for a traditional web server altogether.
Step 2: Set Your Budget and Choose a Provider
Choosing the best web hosting provider is a critical decision that impacts your site’s uptime, speed, and security. Look for providers that offer excellent customer support (preferably 24/7 live chat), strong uptime guarantees (99.9% or higher), and transparent pricing.
You might be wondering about the average cost of web hosting per year. Here is a quick breakdown based on standard industry rates:
- Shared Hosting: $30 to $100 per year.
- VPS Hosting: $240 to $600 per year.
- Cloud Hosting: $120 to $400+ per year.
- Dedicated Servers: $1,000+ per year.
For most new projects, starting with a reputable shared or basic cloud plan is the most cost-effective approach.
Step 3: Register Your Domain and Connect It
Your hosting is the plot of land, but your domain name is your street address.
Registering Your Domain
If you are not sure how to register a domain name for beginners, the process is simple. Use a domain registrar (like Namecheap, GoDaddy, or Google Domains) to search for your desired URL. Try to stick to a .com extension, keep it memorable, and avoid numbers or hyphens. Once you find an available name, add it to your cart and pay the annual fee (usually $10 to $20).
Connecting Domain to Hosting
If you bought your domain and hosting from different companies, you will need to link them by configuring DNS settings and nameservers.
- Log into your web hosting account and find your nameservers (they usually look like ns1.hostingprovider.com and ns2.hostingprovider.com).
- Log into your domain registrar account.
- Locate the DNS management area for your domain.
- Replace the default nameservers with the ones provided by your web host.
- Save the changes. Note that DNS propagation can take anywhere from a few hours to 48 hours to fully update across the globe.
Step 4: Explore Your Hosting Dashboard
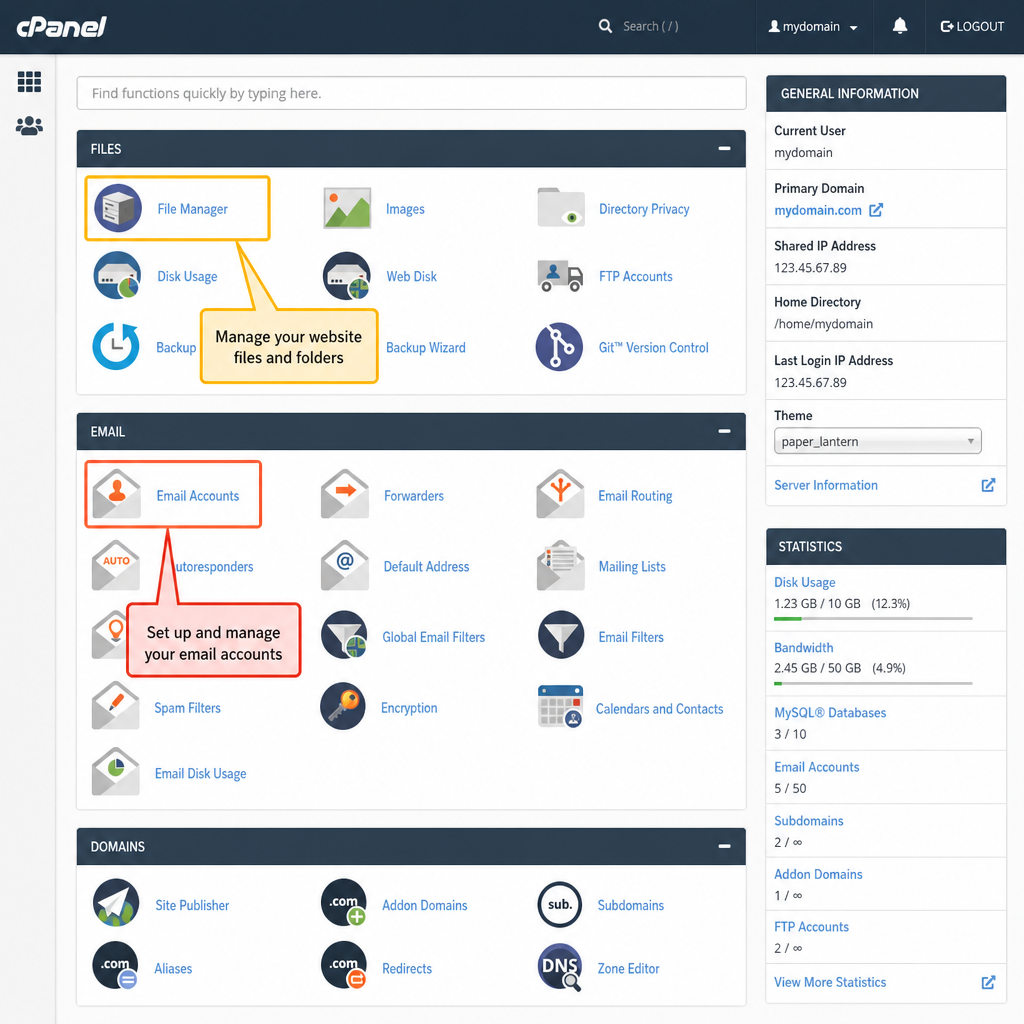
Once your account is active and your domain is connected, you will likely manage your server via a control panel.
The features of a cPanel control panel make server management highly visual and intuitive. Even if you have zero coding experience, cPanel allows you to effortlessly manage databases, check your server’s resource usage, and access vital tools.
Set Up Professional Communications
One of the first things you should do in your control panel is setting up business email addresses. Instead of using a generic Gmail account, you can create a custom email like hello@yourdomain.com. Simply navigate to the “Email Accounts” section in cPanel, choose your domain, and generate your new inbox and password.
Deploying Your Website Platform
Next, you will need a framework to build your site. For most users, this means installing a content management system (CMS) like WordPress, Joomla, or Drupal. Most modern hosts provide “One-Click Installers” (like Softaculous). With a single click, the server will automatically create the database, install the core software, and link it to your domain.
Step 5: Upload Files and Secure Your Site
If you decided not to use a CMS and instead had a developer write custom code for you, you will need to move those files from your computer to your live server.
File Transfer
This is done by uploading website files through FTP (File Transfer Protocol). You can download a free FTP client like FileZilla, enter your server credentials (provided by your host), and drag-and-drop your index.html and accompanying folders directly into the public_html directory of your server.
Securing Your Connection
Before you officially share your link with the world, you must prioritize security. Search engines and browsers penalize websites that do not have active encryption. Thankfully, securing a site with free SSL certificates is easier than ever. Most hosts include an integration with Let’s Encrypt. Navigate to the “SSL/TLS” section of your dashboard, select your domain, and click “Install.” Your website will instantly transition from HTTP to a secure HTTPS connection, displaying the trusted padlock icon in the browser bar.
Step 6: Ongoing Optimization and Maintenance
Learning how to host a website does not stop once the site goes live. A successful webmaster must actively monitor and maintain their digital property.
Maximize Speed
User experience heavily relies on website speed and server performance optimization. A slow website leads to high bounce rates. To optimize your server, consider enabling server-level caching, compressing your image files before uploading them, and using a Content Delivery Network (CDN) like Cloudflare to serve your site from data centers closest to your visitors.
Prepare for the Worst
Never assume your data is perfectly safe. Servers crash, software updates conflict, and cyber-attacks happen. This highlights the absolute importance of regular website backups. Most good hosts offer automated daily or weekly backups. Make sure this feature is turned on, and periodically download a manual backup to your local hard drive just in case.
Handling Issues
Occasionally, things will go wrong. Troubleshooting common web hosting errors is a necessary skill.
- 404 Not Found: Usually means a broken link or a misconfigured .htaccess file.
- 500 Internal Server Error: Often caused by a faulty plugin, an exhausted PHP memory limit, or a syntax error in your site’s code.
- Database Connection Error: Means your site cannot communicate with its database; check your wp-config.php file to ensure the database credentials match your cPanel settings.
Upgrading and Migrating
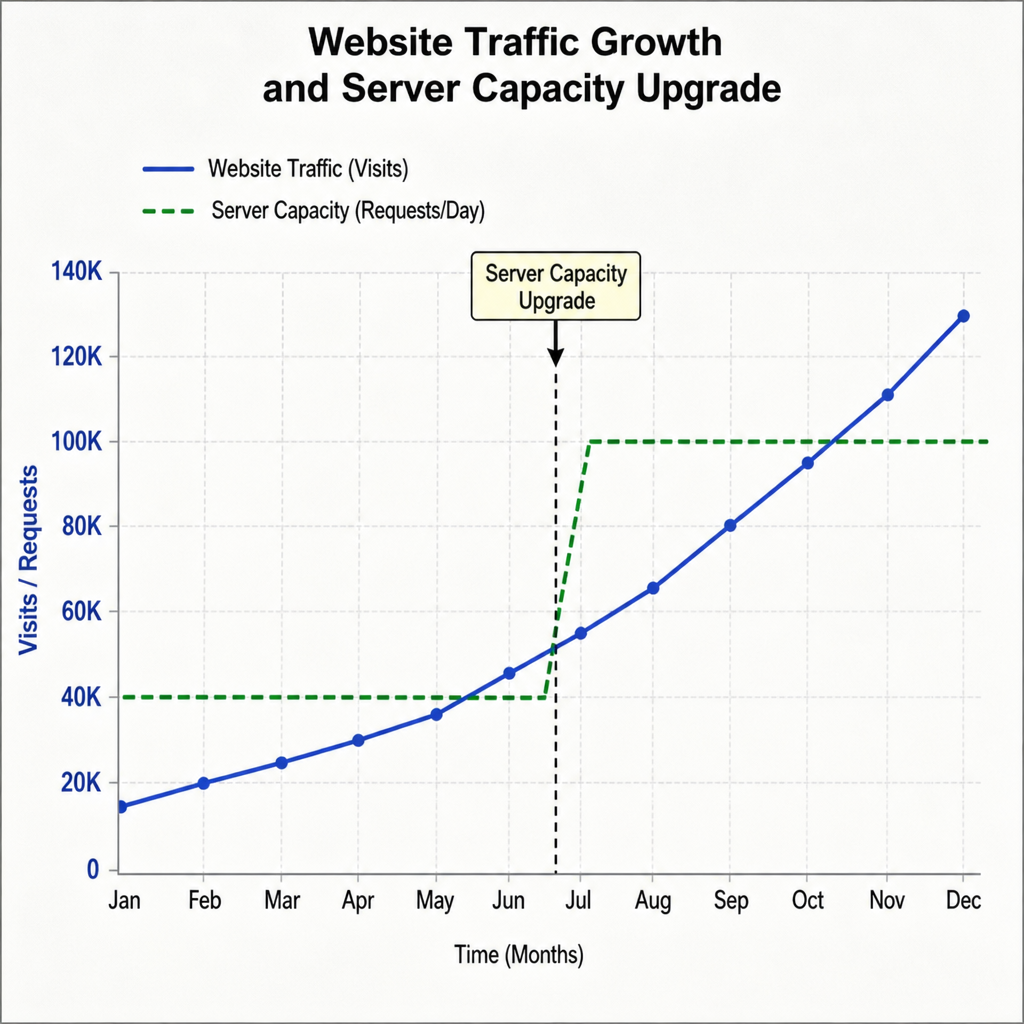
As your site grows in popularity, your initial hosting plan may no longer be sufficient. You will need to start scaling resources for growing traffic, which typically involves upgrading from a shared plan to a VPS or Cloud setup with higher RAM and bandwidth caps.
Sometimes, scaling means leaving your current provider entirely if they fail to meet your evolving needs. If you find yourself in this position, learning how to transfer a wordpress website to another host is vital. The migration process usually involves exporting your database, downloading your wp-content folder, and importing them to the new server. Many premium hosting companies even offer free white-glove migration services to win your business.
Conclusion
Taking the leap to host your site might feel intimidating initially, but by tackling it step-by-step, you gain total control over your digital footprint. From understanding the nuances of different server environments to setting up robust security and optimizing performance, you now have the foundational knowledge required to manage your web presence effectively.
Remember, figuring out how to host a website is a highly rewarding skill. Start with a budget-friendly shared plan, choose a domain that represents your brand, lean on tools like cPanel and one-click CMS installers, and never neglect your backups. By following these essential steps, your website will be well-equipped to serve visitors reliably for years to come.
Hostinger offers beginner-friendly hosting, strong performance and competitive pricing, so view its available hosting options here.
“This article contains affiliate links, meaning we may earn a commission at no additional cost to You “ editorial@BLAK BEIGE
